Image and file sizes must conform to the PhotovaultOnline HD standard, described as HD – Images must be sized with either the height exactly 1080px or the width exactly 1920px (2mb). So we need to ensure that our image is either 1920 pixels wide or 1080 pixels high AND that it is no more than 1920 pixels wide or 1080 pixels high.
For this example we have an image that is 4896 pixels wide and 3264 pixels high. We will use the free Windows application FastStone Image Viewer to demonstrate how to do this. Most image viewer or editor applications work in a similar way to this and you should be able to apply this example to your chosen application without much difficulty.
With the image file open full screen in the FastStone Image Viewer or selected in its image browser, press Ctrl-R to select the Resize / Resample function.

First we must ensure that the Preserve Aspect Ratio option is turned on. This will ensure that as we change the width or height, to other dimension will change automatically.

Ensure that the Pixels section is selected and change the width to 1920.
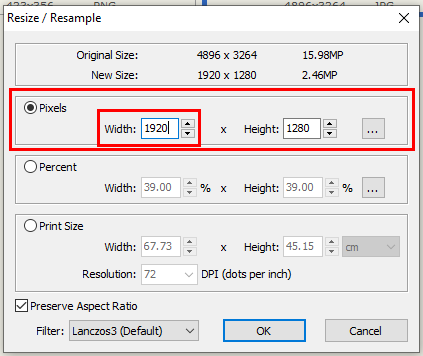
Notice that the height has changed as well. If it was less than 1080 pixels that would be all we needed, but it is 1280 and that is too big. This image will have to be exactly 1080 high rather than exactly 1920 wide, so change the height to 1080.

Our image will now be exactly the needed height and the width will be less than what is allowed, so press OK to accept the resize.
The image in this example was in a horizontal format; if it had been either a vertical or square image then you would have immediately set the height to 1080 and the width would have been set to either 1080 for a square image, or less than 1080 for a vertical image; the desired result.
The next and final step is to save the image, ensuring that the resulting file will be no larger than 2MB (megabytes).
Press Ctrl-S to select the Save As function. Select the desired folder and enter a name for the new file. Ensure that the type to be saved is JPEG Format (*.jpg,*.jpeg).

Now press the Options… button to open the File Format Options.

In this case we see that the new file size will be 1,680KB (kilobytes) or approximately 1.7MB so the file will be smaller than the maximum allowed and we can press Cancel, then press Save on the Save As dialog and we’re done.
If the new file size was greater than 2,048KB we would have needed to reduce the quality to make the file smaller. We do this in one of three ways; move the slider, type a smaller value or use the spinner buttons to reduce the value.

We want to reduce the value gradually, one percent at a time, keeping an eye on the changing new file size. Once we reach a new file size less than 2,048KB, we have reduced the quality enough. Then press OK and finally press Save on the Save As dialog.
We now have a new file that will meet the requirements and be accepted for uploading to the PhotovaultOnline event.
