When images are viewed on a computer screen or when projected, the screen around the image appears black, or near-black. If your image does not completely fill the screen and has large dark areas running to the edge of the image these tend to blend into the background and viewers’ eyes can wander out of the frame.
The solution to this is to add a narrow border in a contrasting colour to the image, which is enough to keep eyes from straying beyond the frame. There is no set way to do this and I will demonstrate how I do it using FastStone Image Viewer, a free application for Windows. But first some links to ways to add borders in other applications you might be using.
- How to Easily Add a Border in Lightroom
- How To Quickly Add Borders When Exporting Photos From Lightroom (Without Using the Print Module)
- How to add a border or frame around a photo in Photoshop
- How to Add a Border to Images in GIMP 2.10
- GIMP Add Border filter
We must be aware of two problems when adding a border to an image we will submit to the club.
- If we resize the image to meet requirements first, then add a border, we may make the image larger than PhotovaultOnline will allow.
- If we add a narrow, one or two pixel border to the full-sized image, then resize it, we may end up with the border missing or fainter on one or more sides of the resized image.
The solution to this is to resize the image first; then add a narrow border inside the image, thereby not changing the image size. The method shown below using FastStone Image Viewer’s Border Effects function does this.
If you are viewing your resized image full screen, then you access Border Effects by moving the mouse pointer to the left edge of the screen and selecting Border Effects there.

Or if you are viewing images in the FastStone browser, select the one you want to add a border to and choose Effects | Border Effects from the menu. In either case you will see the Border Effects dialog.
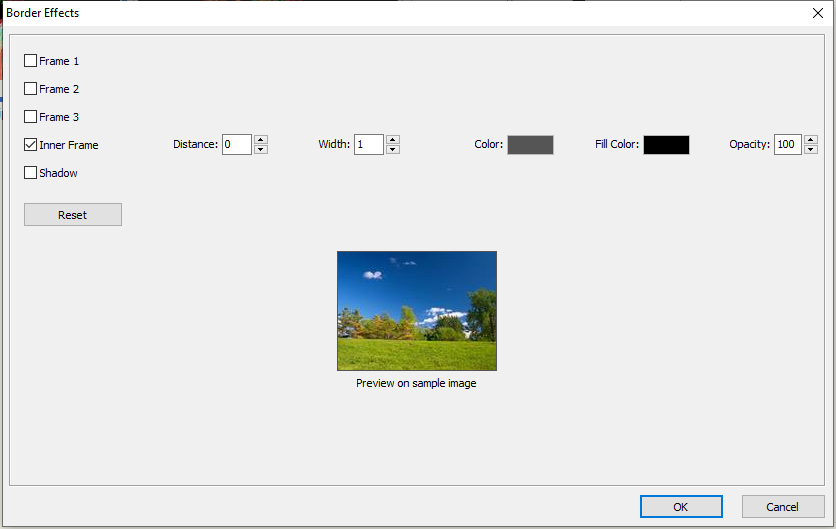
Here you need to disable Frame 1, Frame 2, Frame 3 and Shadow, leaving only Inner Frame enabled. Set the distance to 0 (zero) so the border will be right against the outside edge of the image and set width to 1 or 2 pixels, as you prefer. Fill Color is not relevant so should be set to or left as black and opacity must be set to 100. The important setting now is Color so click on the colour swatch to open the colour editor and choose a color.
We intuitively think that if we want a single pixel border to isolate dark image areas from a black background, that we should make the border white. This is not the best choice and will result in a border that is far too bright and distracting. Instead we should choose a fairly dark grey colour. Experience has shown that using an RGB value of (85,85,85) works well for both colour and monochrome images; so set the Red, Green and Blue values to 85 and click OK.

The Border Effects dialog is now set up the way we want so we can click OK to add the border before saving the changes to the image file.
FastStone Image Viewer will remember your Border Effects settings so if this is all you use it for you can simply open Border Effects and click OK to add borders in future.
The single pixel grey border I prefer may not suit you and you can adjust this to your own preferences, varying the width, colour and opacity of the border to whatever you prefer.

One thought on “Adding a border to your images”