Pixiq published this diverse collection of photography-related links from the past week.
Lightroom ate my photos!
One of our members sent me an email with a question and while replying I thought this may well be a problem that others have so I should blog the answer. This was the question.
I have Lightroom 2, but have not really got my head around to understanding it – but then I don’t spend much time trying I suppose! The one thing that I find frustrating, is that images seem to “get lost” – if I try to open some of my older images, it says “file missing or offline” – I don’t know how to get them back? Can you please help me if you can?
Lightroom is as much an image management system as it is an image processor. It uses a database to keep track of your images and the non-destructive changes it makes to them. There are several options for importing images, some of which reference an image where it is on your disk and others that copy it from a memory card to some place on your disk and then reference it from there. They key here is that Lightroom doesn’t have the actual image in its database, but a reference to it at some location on disk.
I will talk only in terms of Lightroom on Windows below but I believe the Lightroom functionality will be the same on the Mac and references to Windows Explorer can be substituted with Finder there.
Let’s say you have an image portrait01.jpg in a folder C:\Pictures\Portraits (no significance to the names, just chosen for demonstration) and import it to Lightroom. A record is made in the database, including the location of the file on disk (C:\Pictures\Portraits\portrait01.jpg). If you later move the image using Lightroom’s own management features, it knows where the image moved to and can update the reference to the disk location accordingly. If however, you were to use the image outside of Lightroom using Windows Explorer or some other tool, Lightroom will not know this. When next you use Lightroom it will look at the location it has, and not finding the file there will report the file missing or offline message. That covers the file missing aspect of the message. The offline aspect is a bit different. Let’s say your image is on an external USB drive that is mounted with a particular drive letter (G: for instance); Lightroom will record the location on the G: drive (say at G:\2011-06-17\photo04.jpg). Later when you run Lightroom without the drive connected, or if it is connected but mounted under a different drive letter, Lightroom will not be able to find the file G:\2011-06-17\photo04.jpg and so the photo is missing. In either case you will still have access to many of Lightroom’s features; the database contains a low-res preview version of the missing images, along with all the metadata, keywords etc. so you will still be able to look for images, add keywords and so forth. No functions that require access to the actual photo file will work though.
The way to ‘get images back’ depends on whether the file is missing or offline. If it’s offline because the external drive containing it is not connected, just connect the drive making sure that it gets the same drive letter it had before, and Lightroom will now find the file. If you had moved the file outside of Lightroom you will need to use the locate function to point Lightroom to where the file is now. The image thumbnail will have an icon overlay showing the file is missing.

If you click on it you will be shown a message box asking it you want to locate the file.

When you click on the Locate button you are shown a standard file open dialog that you can use to select the new location of the file.

Unfortunately you need to know where the file is now, but Lightroom does give you a little help. On the confirm dialog the full path the the file, including the name is shown, so we see in the screenshot above that the missing file is called Colours of Light.jpg so if you don’t know where it is now you can at least use a search utility to help you find it.
Both Windows and Mac have built-in search utilities but I prefer to use a free third-party Windows utility called Everything for this. I can run Everything and type in all or part of the file name from the Confirm dialog to see where the file might be now.

We can see that I moved the file to the folder C:\Users\Steve\Pictures\Moved Files so I simply need to navigate there in the Locate dialog, select the file and Lightroom will once again have full access to the file. If you have not only moved but also renamed the file then you are not going to be able to do this if you don’t remember what the new name is and you may have to resort to deleting the image entry from the Lightroom database, but then you will lose any processing or keywording you’ve done on the file too.
It’s better never to have to do this; I know I don’t. But how is this possible? Simple. I never use anything but Lightroom to manage my photos. My advice is this; once you have imported your photos into Lightroom, don’t ever use Windows Explorer, Finder or anything else to manipulate your image files. If you need a copy of the photo at a different size, in a different folder or with a different name; export it from Lightroom so your original file remains untouched. It you want to move your files around, use the Library module in Lightroom to move them.
Adding a border to your images
When images are viewed on a computer screen or when projected, the screen around the image appears black, or near-black. If your image does not completely fill the screen and has large dark areas running to the edge of the image these tend to blend into the background and viewers’ eyes can wander out of the frame.
The solution to this is to add a narrow border in a contrasting colour to the image, which is enough to keep eyes from straying beyond the frame. There is no set way to do this and I will demonstrate how I do it using FastStone Image Viewer, a free application for Windows. But first some links to ways to add borders in other applications you might be using.
- How to Easily Add a Border in Lightroom
- How To Quickly Add Borders When Exporting Photos From Lightroom (Without Using the Print Module)
- How to add a border or frame around a photo in Photoshop
- How to Add a Border to Images in GIMP 2.10
- GIMP Add Border filter
We must be aware of two problems when adding a border to an image we will submit to the club.
- If we resize the image to meet requirements first, then add a border, we may make the image larger than PhotovaultOnline will allow.
- If we add a narrow, one or two pixel border to the full-sized image, then resize it, we may end up with the border missing or fainter on one or more sides of the resized image.
The solution to this is to resize the image first; then add a narrow border inside the image, thereby not changing the image size. The method shown below using FastStone Image Viewer’s Border Effects function does this.
If you are viewing your resized image full screen, then you access Border Effects by moving the mouse pointer to the left edge of the screen and selecting Border Effects there.

Or if you are viewing images in the FastStone browser, select the one you want to add a border to and choose Effects | Border Effects from the menu. In either case you will see the Border Effects dialog.
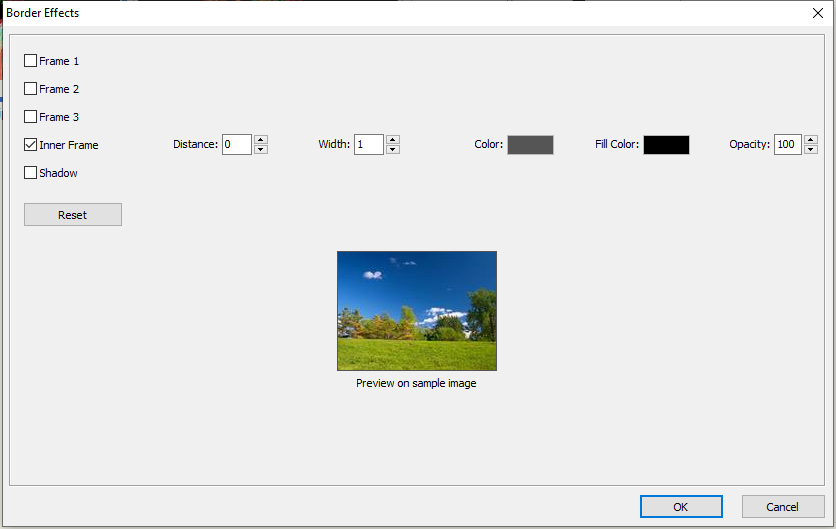
Here you need to disable Frame 1, Frame 2, Frame 3 and Shadow, leaving only Inner Frame enabled. Set the distance to 0 (zero) so the border will be right against the outside edge of the image and set width to 1 or 2 pixels, as you prefer. Fill Color is not relevant so should be set to or left as black and opacity must be set to 100. The important setting now is Color so click on the colour swatch to open the colour editor and choose a color.
We intuitively think that if we want a single pixel border to isolate dark image areas from a black background, that we should make the border white. This is not the best choice and will result in a border that is far too bright and distracting. Instead we should choose a fairly dark grey colour. Experience has shown that using an RGB value of (85,85,85) works well for both colour and monochrome images; so set the Red, Green and Blue values to 85 and click OK.

The Border Effects dialog is now set up the way we want so we can click OK to add the border before saving the changes to the image file.
FastStone Image Viewer will remember your Border Effects settings so if this is all you use it for you can simply open Border Effects and click OK to add borders in future.
The single pixel grey border I prefer may not suit you and you can adjust this to your own preferences, varying the width, colour and opacity of the border to whatever you prefer.
HDR and Beyond – Seeing is Believing!
 On the Digital Photography School blog, Gavin Phillips writes,
What is High Dynamic Range Imaging? (HDR)
HDR is when you take 3-5 or 7 photos at different exposure settings, and then merge them into a single image using speciality software. What you get are beautiful photos with incredible detail, controlled lighting and accurate colour. You cannot reproduce an HDR image manipulating a single JPG or RAW image in Photoshop.
Cold and spellbinding: An alignment of planets in the sunset sky
This might be a good time to turn your cameras towards the night sky, with Jupiter, Venus and the moon converging on one another.
Here’s a photo I took of a previous convergence, or conjunction as I believe the phenomenon is also known.

Dr. Tony Phillips writes on physorg.com,
The brightest planets in the solar system are lining up in the evening sky, and you can see the formation—some of it at least—tonight.
Every World Press Photo Winner From 1955-2011
No text on this page, just a collection of excellent photographs, many of them iconic ones that you will recognise.
How Do I Calibrate My Computer’s Monitor for the Best Picture?

Calibrating our monitors and printers is something that we, as photographers, should be particularly concerned with. Lifehacker recently made a blog post that talks about this, covering some of the options available.
Great race car photos, and more

On her blog, our member Noleen has posted about Stephan Cooper, accomplished car photographer. There are a number of photographs covering motor racing as well as some more personal work in the form of landscapes and portraits. She begins,
Famed photographer and author Scott Kelby listed Stephan Cooper as one of “The Best five photographers you might not have heard of” I am proud to say I can call this photographer a friend.

Time lapse video of the Milky Way

Chris, one of our members, sent me this link to a beautiful time lapse video of the Milky Way. The picture about is a grab of one frame and gives some idea of what the video is like.
Terje Sorgjerd, the photographer behind the viral video The Aurora, has done it again. Here, Sogjerd captures the Milky Way over El Teide, Spain’s highest mountain. Click through to watch, and get details on how the video was made.
Filmed between April 4 and April 11, 2011, the individual frames were shot using a Canon 5D Mark II with a Canon 17mm TSE, Canon 16-35mm II, Canon 24/1.4II, and Sigma 12-24mm.
F-Stop Blues
 Florian, one of our members, sent in this article that he thought others might find interesting. It begins,
For years, lens makers have fought hard to market lenses of wider and wider aperture. Wide apertures (e.g., f /1.4 instead of f /2) but a series of measurement published on dxomark.com cast some doubts on the real benefits, for digitally equipped photographers, of these progresses.
